Acoustic Treatment – here’s what we’re trying to fix
Room EQ Wizard is a wonderful free tool for evaluating the acoustic conditions in a room. And Sketchup is a wonderful free tool for modeling a room. I used both of these to evaluate my recording space, and to develop a baseline for comparison as I add treatment.
A Look at the Room
Since we’re treating a room it makes sense to start by examining the room a bit further. After a little playing in Sketchup I came up with this:
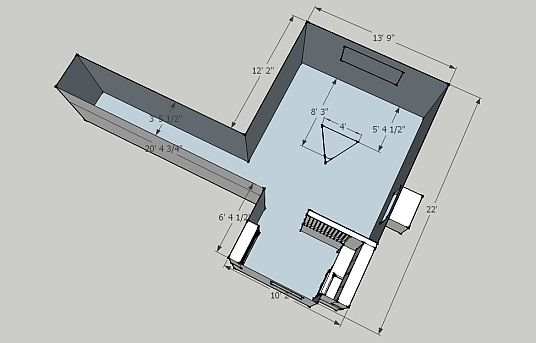
Digital Duck Recording Studio in Sketchup
Believe me I feel lucky to have so much room to devote to recording. My space has no sound proofing features, and sits on a fairly busy street, with a playing field across the street, so serious recording has to wait until the late evening. Soundproofing is a difficult and expensive business, so I just live with the noise.
The triangle represents the listening position, with a pair of Dynaudio BM6p speakers a little over 5 feet in front of the window. Here’s a pic that shows the layout:
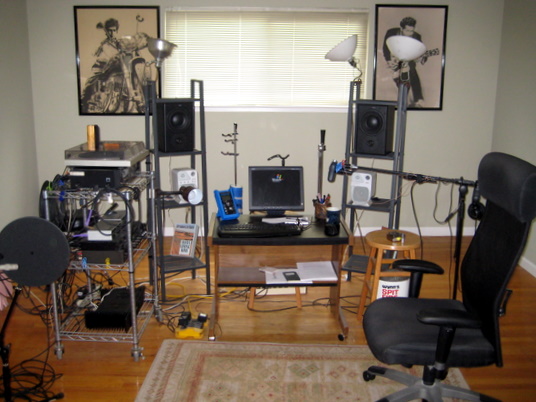
Digital Duck Studio with Bobby and Chuck providing inspiration
Gear
The computer sits in the next room, our guests get to listen to the noise so I don’t have to. My audio interface is a LynxTwo-C, with 6 inputs and 2 outs. The recording rack holds a John Hardy M-1 preamp along with a pair of M-Audio DMP-3 preamps.
I have a half-broken mic boom stand that I use for a headphone stand. Since I’ve embarked on room my room measurement endeavors I’ve pressed it into service to position the SPL meter and the measurement mic. Here’s a shot of the boom – the phones are Audio Technica ATH-M50s and they’re terrific.
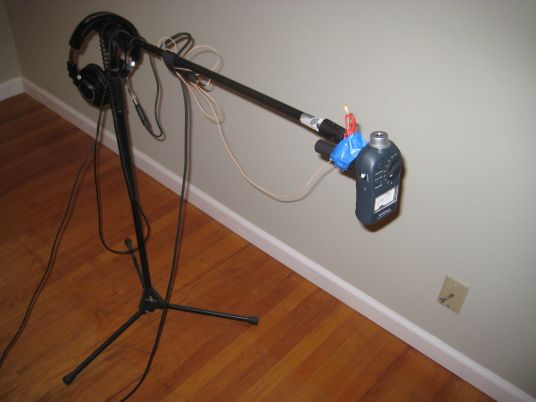
Boom stand holding SPL meter and measurement mic
Just to give you an idea of the level of engineering that goes on around here, a closeup of the DPA 4061 and the Radio Shack SPL meter. Note the NASA grade paper clip and masking tape:
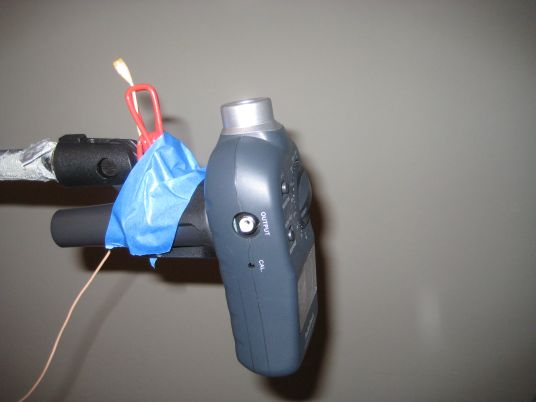
Measurement mic and SPL meter up close
Measuring with Room EQ Wizard
I was fooling around with Room EQ Wizard and decided to try moving the measurement mic around a bit to see how the results changed. One of the usual problems with an untreated room is a wide variation in the sound in different locations in the room. I set up REW and took three measurements, starting at the listening position then moving back a foot each time.
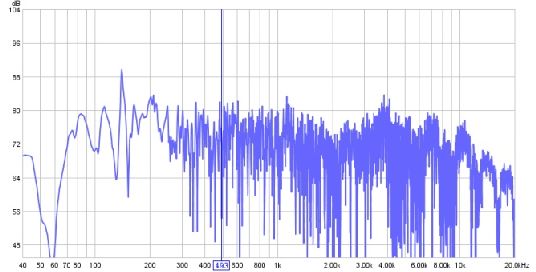
At the listening position
This first shot shows the full spectrum from 40 hz to 20 khz, but in an untreated room the reflections swamp the signal in the higher frequencies. The problems at the low frequencies seem pretty fierce, with big swings between 100 and 200 hz. These are the bass notes on the guitar, extending from 73.42 hz for the low D I usually use, up to the third string G at 196 hz. The huge swings in response will make some of these notes boom and some disappear.
Here’s the graph for the same measurement, but 1 foot further away from the speakers.
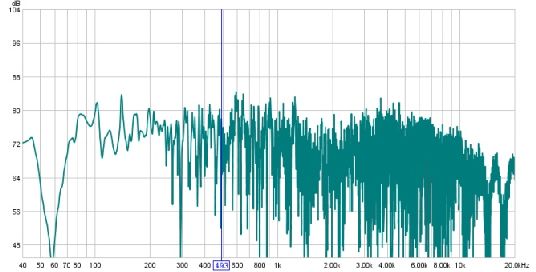
1 foot behind the listening position
This graph looks a bit better, but we still see over a 20 dB swing in the frequency response between 100 and 200 hz, and we’re seeing that different notes will be emphasized and muted.
The third graph shows the measurement from 2 feet behind the listening position.
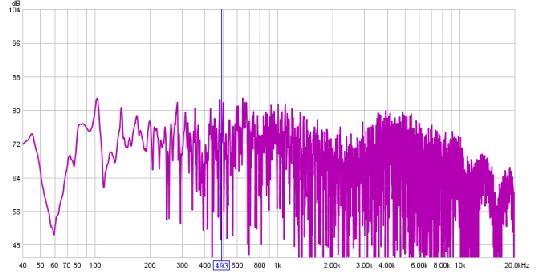
2 feet behind the listening position
Once again the specific notes impacted by the frequency response variations has changed. The effect is easier to see when all the plots are displayed on a single chart:
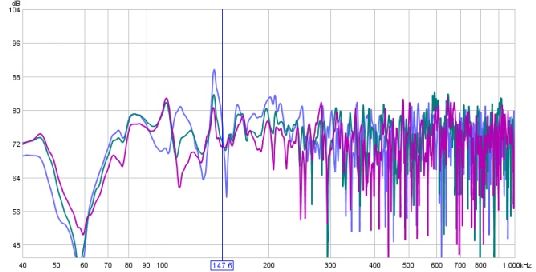
REW graph 40 to 1000 hz, 3 measurements combined
Each of these measurements has at least one steep dip between 100 and 200 hz, and each one will mute a different musical note. And these effects were found by moving only 1 foot each time.
The Sound of the Room
Since my goal is to improve my recording space it seems reasonable to do some before and after comparisons of recordings, so I set up a Jecklin disk mic array with my Shure KSM141 mics switched to their omni setting. This arrangement of omni mics with a baffle between them is usually used for concert hall recording and other classical music sessions:
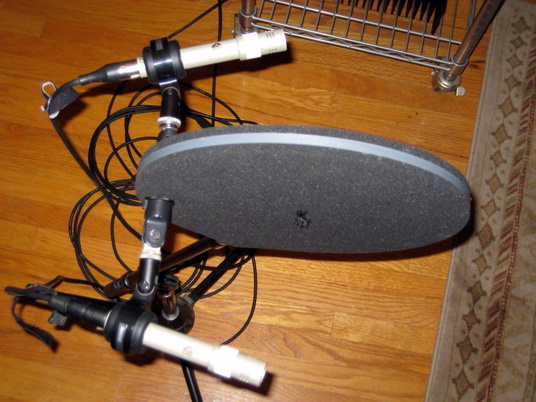
Jecklin disk mic array with a Shure KSM141 pair
This mic arrangement uses omnidirectional mics, so we’re getting the great extended bass of a fine omni mic but we’re also getting a lot of the room sound. I positioned the mic about 2 feet from the guitar which gives a wonderful stereo image and very natural tonality, but once again brings in a lot of the room sound. Here’s a picture of the recording arrangement:
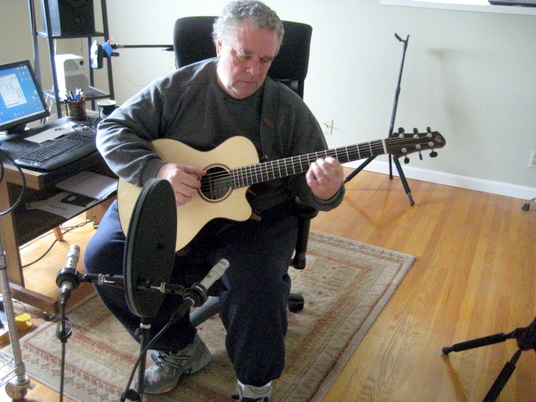
Vamping for the microphones
Most of us recording at home usually use directional mics and place them much closer to the guitar, in an effort to reduce the impact of the room. But directional mics exhibit a rising bass response called proximity effect which increases as the mic gets closer to the sound source. If we can help our room sound better, we gain a lot of flexibility in the mic techniques we can use.
Here’s the brief clip I recorded:
[audio:post1clip1.mp3]or if your prefer, download clip 1
Then as an experiment I moved the mics and chair both about 2 feet, keeping the distance between them the same, and recorded again:
[audio:post1clip2.mp3]or if your prefer, download clip 2
I don’t put much stock in listening tests where we hear different performances, because it’s impossible to tell whether the sonic differences are due to the recording technique or the playing technique. In this case I can tell you that the difference in the two recorded clips is much greater than the difference in the two performances, and I think it’s due to the wildly varying frequency response in this untreated room.
This entry was posted on Thursday, February 19th, 2009 at 11:35 pm and is filed under Acoustics, Tutorials. You can follow any responses to this entry through the RSS 2.0 feed. You can leave a response, or trackback from your own site.
Homebrewed Music − 13 Broadband Absorbers said in post # 1,
on February 23rd, 2009 at 1:59 pm
[…] pleased with the this graph in the area between 100 and 200 hz. In the untreated room measured in our last blog entry each measurement showed a distinctly different dip, right in the low strings of the guitar. The new […]
chris said in post # 2,
on March 13th, 2009 at 5:25 am
Hi,
I’m experiencing the same thing you describe with recording a classical guitar. I close mic with condensor mics (oktava) because when i move them more then say 1ft away, it starts to sould bad (room i guess). But too close up misses some of the natural resonances that you can hear with your ears. In short, the recording does not sound as good as the guitar sounds. So i’m thinking of building absorbers like you. Where can i get this OC 703 stuff?
Thanks for all your helpful articles.
Fran said in post # 3,
on March 13th, 2009 at 11:53 am
The OC703 is Owens Corning compressed fiberglass. Other manufacturers make similar products, some fiberglass, some rockwool, even acoustic cotton.
I got my OC703 at The MacArthur Company. I included information on that company, a bill of materials, and a video showing the construction of one panel in another article: Building a Broadband Absorber (On the Cheap).
Installing these panels made a bigger difference in my recording than any piece of equipment or software I’ve purchased.
Fran
Stuart said in post # 4,
on June 22nd, 2013 at 1:43 am
After I had calibrated my sound card, I tried to measure my recording space using REW, with an AER C-60 acoustic guitar amp for the source and a Rode M3 as the measurement mic (the flattest response mic I had), but the graphs were terrible. There was a general rise in sound pressure with frequency with some nasty peaks and dips along the way. After spending half a day moving acoustic panels (rockwool) and bass traps around to no significant effect, I thought of conducting a measurement outdoors, where there were no room reflections, to see what would happen. The graphs were much the same!!
I have a Behringer ECM8000 mic on order and I probably need a better source speaker, but it’s clear that I cannot presume that my source and mic combination will give a flat result. I really need to calibrate these (somehow) as well. I don’t have an anechoic chamber, so outdoors (my studio is in a quiet area) may have to do.
I would be interested in your thoughts on this issue.
Stuart
Fran Guidry said in post # 5,
on June 22nd, 2013 at 10:20 am
The M3 is a directional mic, so it’s immediately not suitable for measurement.
For our purposes you could create a calibration curve outdoors that would compensate for both the speaker (use a single speaker) and the omni mic.
Fran
Stuart said in post # 6,
on June 23rd, 2013 at 3:21 am
Thanks Fran. That’s what I plan to do; hopefully the Behringer mic will do the trick. I am keen to get my room set up so that it’s response is reasonably flat. To date, my attempts to record nylon string guitar have been pretty disappointing, with a very ‘boxy’ sound. My attempts at room treatment have provided some improvement, but I’d like to measure the effectiveness of what I’ve done before I invest further.
Stuart