Go Type II Parlor travel guitar

Tuesday, June 12th, 2007

Just before we left for Hawai`i in April, I received my handmade Go Type II Parlor guitar from Sam Radding at Go Guitars. You can see some clips of this little instrument in action at my Kaleponi Music News blog.

For the last few years, I’ve checked my full size guitar in a Calton case, but I really enjoy having a guitar with me during those long airport waits. When I learned that Mr. Radding would build one of his parlor guitars with a custom neck shape and bridge spacing, I signed up. His guitar turned out to be a great success, small enough to fit in the airliner overhead compartment, good enough to play on stage at the Royal Hawaiian Hotel.

When we returned from our trip, I contacted Matt Hayden to see if we could get together to compare his Larrivee Parlor to this new one. Matt’s guitar is walnut and sitka, just like the Go, so the comparison seemed like a natural.

Here are some pics showing the two guitars side by side.

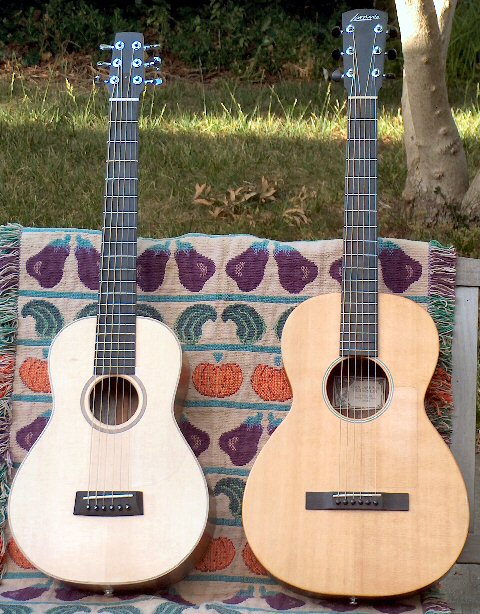
The Larrivee is several years older, so the sitka spruce top has mellowed to a lovely shade. The smaller body of the Go is evident in this shot, as is the compact headstock and lesser overall length.

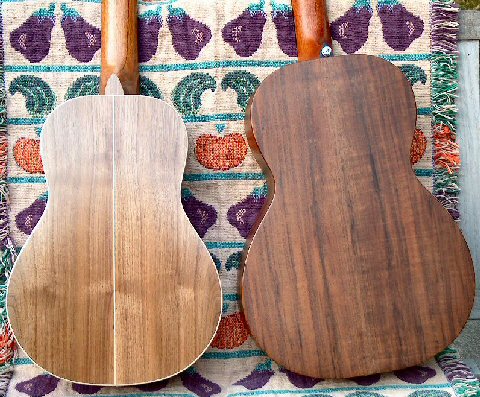
Looking at a closeup of the backs, I prefer the walnut back of the Larrivee with its slight curly figure and darker finish, but many people commented favorably on the interesting figure of the Go walnut. The bookmatch on the Go two piece back is nicely done, and the backstrip adds a little appeal as well.

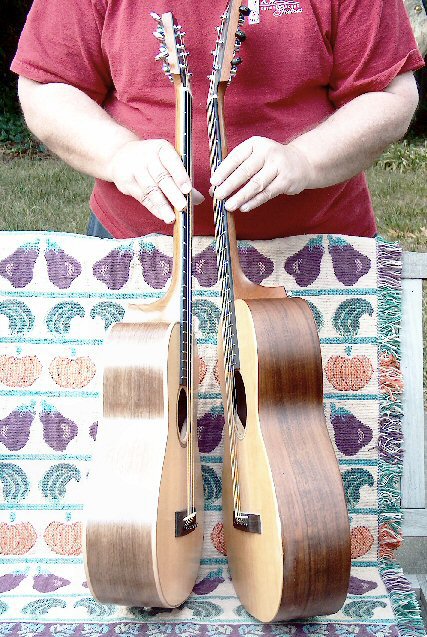
This side by side shot illustrates the shorter body and longer scale of the Go. I think it’s amazing that Mr. Radding has squeezed so much guitar into such a diminuitive shape.

I plugged a DPA 4061 mic into my Marantz PMD670 recorder and played a verse of “Kui Lima” on each guitar. Here’s the Larrivee sample (link). The Go sounds like this (link). In person, the Go seemed a little fuller and a bit louder. In fact, everyone who tried the Go so far has expressed amazement at the amount of sound that pours out of this tiny guitar.

As far as playability, the comparison is a bit unfair. I owned a Larrivee similar to Matt’s but sold it because I had a hard time with neck shape and bridge spacing. One of the great advantages of the Go Parlor is the availability of custom neck shape and bridge spacing. The slightly wider neck and bridge on my Go Parlor makes all the difference in ease of playing.

The first generation of Larrivee Parlors, like Matt’s, were built as style 01 Larrivees, which means they were stripped down models. They were also a wonderful bargain. But these days Larrivee only builds these guitars with style 09 trim. They’re much more nicely finished but cost over twice the price of the older model. The Go, which is handmade and available with custom features, is a terrific value and a very fine way to carry your music with you wherever you go.


Very Inexpensive Microphones

Thursday, April 5th, 2007

From what I’ve read on various internet forums, it’s much easier to make a good omnidirectional (or non directional) (or just omni) mic than it is to make a good directional mic. And as a result it should be easier to find good, cheap omni mics, which would be great for me, because I love them. They can be placed very close to the source because they don’t have the proximity effect that occurs with directional mics. They seem to capture a big, clear, realistic sound very easily.

The problem has been that there are not a lot of omni mics around. The market doesn’t seem that interested in omnis, so the manufacturers are not interested. In the five years or so that I’ve been recording and buying gear, I would guess that models of directional mics in the marketplace outnumbered omnis by 20 to 1 or more, and almost all the hip new inexpensive mics have been directional.

In the last year or so, though, Jon O’Neil and his Naiant Studio Store has begun selling a very inexpensive omni microphone which Jon builds himself. He use readily available capsules, adds his own active electronics, and mounts the whole thing in an XLR connector shell. The result is compact, rugged, and inexpensive. I think they work pretty well, too. Here’s a brief comparison of a pair of Naiant MSH-1 omnis to a pair of DPA 4061s:

Naiant MSH-1
DPA 4061

The DPAs carry a list price of $429, and they require an adapter to connect to standard mic preamps that adds about $75 to the cost. Even used they cost about 10 times as much as the Naiant MSH-1 costs new. It’s certainly true that the DPA can be used in more applications, because it’s very small and unobtrusive, and the two different mics are not equivalent, but just on the basis of sound quality, I think they’re amazingly close.

This year Naiant began selling the MSH-2, a mic based on a larger capsule. Jon describes this mic as having lower noise and a gently falling high end compared to the MSH-1. I’m a sucker for an inexpensive omni, so I ordered up a pair. Here’s a recording using one of these new mics alongside an industry standard for microphone quality. I’m using a John Hardy M-1 preamp and Lynx2 converters. This time I set up the Naiant MSH-2 on one channel and a Schoeps CMC6/MK2 on the other. I mounted the mics so they were a few inches apart and about 6 inches from the Martin OM-18GE. Here are the two mono files that resulted:

Naiant MSH-2
Schoeps CMC6/MK2

I can hear some slight differences, although they’re pretty subtle. By turning up the volume and listening to the extended “tail” or decaying signal, I can hear a higher noise level in the Naiant track. But considering that the Schoeps costs about $1400 and the Naiant costs $35, I’d call the similarity pretty amazing. Certainly if someone asked me for an inexpensive microphone to record solo acoustic guitar, I’d be quite comfortable recommending the Naiant MSH-2.


Mic Preamps Compared

Saturday, February 24th, 2007

When I read about preamps at various internet forums and newsgroups, I get the impression that microphone preamplifiers are a significant variable in the recording chain. And yet, when I’ve compared preamps, I don’t notice that much difference. Well, I do notice a difference if I crank the gain all the way up. Less expensive preamps tend do be noisy in their upper gain ranges. If I’m using my old faithful Beyer M260 ribbon mics, I need all the clean gain I can get from my John Hardy M1 mic pre. But if I am using a condenser mic with plenty of output, the mic pre is operating in the middle of its range, and I don’t hear much difference between a decent $150 unit and a decent $1500 one.

Now I know that preamps are used as effects, either blatant or subtle. The blatant ones are inexpensive units with a starved plate tube glowing prominently through some grillwork and a “drive” control to mix distortion generated by this tube into the signal. The more subtle ones often refer to various recording consoles as their inspiration, claiming Neve-like or API-ish qualities. I’ve never experimented with units like these. There may be huge differences between preamps when they’re used on vocals, drumsets, electric guitar amps, or exotic percussion, I just wouldn’t know. My focus is always on simple solo fingerpicked acoustic guitar recordings, where accuracy and clarity are my goal.

Many preamps aim to be accurate. The classic description of an accurate preamp is “a straight wire with gain,” an impossible achievement but an easy ideal to visualize. Product literature and user comments include terms like detailed, musical, natural, transparent. Inferior versions of these accurate preamps are described in internet forums as flat, boring, or two dimensional. Since I have a few preamps around these days I decided to try to do some comparison tests. As always with comparisons like this, the source material is a key issue. I decided to try to run one microphone through all three preamps at once, so the input signals would be the same. Making this connection is fraught with problems. If I connect the mic directly to the three inputs, the input impedance seen by the mic will be quite low, and may affect the mic response. If I use a transformer splitter or active buffer/splitter, the sonic signature of the splitter will be stamped on all the samples. My decision was easy, though, because I already have a box that lets me rig up a passive connection direct to the three inputs. If the mic response is affected, I’ll assume (until I’m shown otherwise) that the response is still the same for each preamp.

The key to this setup is a Coleman Audio LS3 switch box. I normally use this box to select between my headphone amp and monitor amp, but since it’s a completely passive box it works to route inputs or outputs equally well.

The three preamps under evaluation are the John Hardy M-1 as mentioned earlier, along with an FMR RNP and an M-Audio DMP3.

For the first test, I selected an Audio Technica AT4041 small diameter condenser mic. I routed it through the Coleman LS3 to the left channel of each preamp, then connected the left output of each preamp to an input of my LynxTwo C. I matched the volumes rather roughly using pink noise generated by Adobe Audition 1.5 and the metering on the Lynx software mixer. I set up a multitrack session in AA 1.5 to record three mono tracks from the three preamps. I positioned the AT4041 about 12″ from the 12th fret of an Epiphone Masterbilt EF-500M tuned to “drop C” tuning – CGDGBD low to high, and played a brief bit of noodling. After I listened to the tracks I realized I had not matched the levels well enough, so I normalized all the tracks to -3db. Here are the three sample tracks, mono 44.1/16 wave files:

Sample 1
Sample 2
Sample 3

Finally, I thought I would include a comparison with a dynamic mic as the source. It would require more gain from the preamps, and might be useful to folks who only have handheld dynamic stage mics in their collection. This time I used an Electrovoice RE16, connected as before. Again I set levels using pink noise and the Lynx software mixer, then recorded in a multitrack AA 1.5 session. This time the level matching was more accurate, so I didn’t feel the need to adjust the levels after recording. Naturally the performance is different from the first recording, AND THE ORDER OF PREAMPS IS DIFFERENT:

Sample 4
Sample 5
Sample 6

I hope you’ll download these and give a listen. Does one track in each set stand out from the others? Is one more transparent, another lifeless? Can you tell them apart? Perhaps you’d like to know which sample was created by which preamp? Click here for the key to relate the samples to the preamps used to create them.

PS – After I posted these, and after I sold my FMR RNP, people pointed out that the DMP3 samples were high-passed – that is, the DMP3 LoCut switch was activated, causing a shelving rolloff -3db at 72hz, 18db per octave. This may affect the comparison for some listeners and some playback systems.


The $4.00 Digital Studio

Tuesday, February 13th, 2007

On the acoustic guitar forums I visit, one common question goes something like:

How do I record my guitar so I can judge my progress (or lay down a rhythm track or even make a CD just for family and friends). I have a pickup in the guitar, I don’t need great quality, and I don’t want to spend a lot.

Since this person is posting on an internet forum, I will assume they have a computer. If it’s a PC type, it almost certainly has some kind of built-in soundcard, with at least a mic input. So all we need to do is hook the guitar pickup to that mic input and use some sort of program to capture that input and save it to a file. It just so happens that there are some very effective recording programs available to download for free, so that leaves as our only problem some way to connect the guitar pickup to the mic input. And here it is:

This is a 1/4″ phone female to 1/8″ mini male adapter. A normal guitar cable like the one just above the adapter in this picture (male 1/4″ phone plugs at both ends) fits into the hollow side. The pointed side plugs into the mic input of the computer. It costs about $4.00 at any store or web site that sells electronic geegaws (like Radio Shack). This is all you need to connect your pickup to your computer (assuming you have a guitar cable).

Now, on the software side what are the options? Unfortunately, the built-in Windows Sound Recorder is not very useful. It’s limited to about 1 minute of continuous recording without intervention. There are not effects or editing features, no click track or metronome, no metering, and certainly no multitrack overdubbing and mixing.

The easiest free program I’ve found is Audacity – it’s a little clunky but it is full featured. It includes plenty of editing capability and built-in effects, and you can save your recordings to various formats like .wav for burning to CD and (with some free extra software) to .mp3 for your portable music player or web site. I’ve used this little adapter and Audacity to record new song ideas on our laptop when we’re traveling. I’ve also used it to create practice loops when I’m trying to nail a tough section of a new song. Compared to a decent microphone, preamp, and audio interface these recordings are fuzzy, noisy, and crude, but they do the job, and the price is definitely right.

Here’s one verse of an old Hawaiian song, “No Ke Ano Ahiahi,” recorded as a solo guitar instrumental using the the 1/8″ mini plug adapter and Audacity.

And here’s the same track with some reverb added.

Obviously these are not “major label quality” recordings by a long shot. The direct output from a pickup is not very close to the natural acoustic sound of your guitar. But we’ve looked at a tool that can help get your pickup based recordings much closer to a natural acoustic sound in a previous blog entry: “Better EQ Through Software”. And, as we stated at the beginning of this entry, the whole purpose of using this simple, cheap adapter is to get simple, cheap recordings, not Grammy awards.


Better EQ Through Software

Wednesday, November 29th, 2006

Recording acoustic guitar with a pickup is an extremely appealing idea. It eliminates the expense and hassle of microphones, soundproofing, and room treatment. The biggest problem is the sound quality – not usually that great in my experience. But recently I’ve run across some ideas that might make pickup recording a more useable alternative.

Over at the Acoustic Players Forum a Dutch fingerstyle player and Taylor enthusiast named Eltjo Haselhoff started a thread describing his technique for EQing various pickup systems to make them sound more like a guitar recorded using a microphone. He developed a piece of software that compares a piece of music recorded using a mic and a pickup at the same time. The software then defines settings to use with a graphic EQ to make the pickup recording sound more like the miked recording. His results are pretty impressive to many of us.

In the meantime, Doug Young has been demonstrating Har-Bal in some of our sessions together. This is a piece of software that the creator describes as the “worlds first visual mastering software.” One of the features of Har-Bal 2.2 is a quick tool to EQ one file so it resembles another tonally. I decided to experiment with Har-Bal and some pickup and microphone recordings.

I pulled out my Kathy Wingert Model E (You can see pics of it here.) This guitar has a B-Band AST 1470 soundboard transducer pickup system installed, and I’ve been told that it sounds pretty good in amplified situations. I set up a pair of EV RE16 mics in an X/Y configuration, pointing at the bridge at a 45 degree angle, and about 12″ from the guitar. I ran the mics through a John Hardy M-1 preamp, into my LynxTwo-C soundcard, and into Adobe Audition 1.5. I plugged the pickup into a Baggs Para Acoustic DI (PADI), took the XLR out and connected to Channel A of an FMR RNP preamp. This fed another channel on the LynxTwo-C, and I configured Adobe Audition to record this single channel on both sides of a stereo track.

I played a simple Hawaiian vamp and recorded both sources. I kept the recording short because I wanted to present the material as a .wav file instead of a compressed MP3 file. I normalized both files to -2 db so their peak levels match.

The pickup recording: PEQT-PUP.wav
The microphone recording: PEQT-RE16.wav

I don’t think it’s very hard to hear the difference, and I think most people would prefer the microphone recording.

Now what can Har-Bal do for us? I loaded the microphone track as a reference, then loaded the pickup track as the active file. I chose the IntuitMatch cursor and passed it over the pickup track. Har-Bal computed an EQ set that would bring the pickup closer to the tonal balance of the microphone track. The result was not identical, but much closer. And to my ear the result was pretty impressive.

The Har-Bal adjusted track: PEQT-PUP-EQ.wav

I still prefer the microphone track, but I could certainly live with the adjusted pickup track. Perhaps a little tweaking with reverb or delay might add a little of the “air” and “body” that are still missing. It certainly seems worth exploring further.


New mics and live recording

Thursday, November 2nd, 2006

This past sunday I performed at Pacific Bay Coffee Company here in Walnut Creek. As always it was an enjoyable experience.

Since I just snagged some new mics on Ebay I decided to try them out as live performance tools. The mics are a pair of Electrovoice RE16 dynamic hypercardioids. These mics have the “Variable-D” feature that reduces proximity effect.

I used one RE16 for my vocal introductions and the other pointed at the bridge of my Martin OM-18GE. The mics were plugged into my very modest Peavey powered mixer, which was driving one pole-mounted Klipsch Heresy speaker.

I also recorded the show, using the tape out jack on the Peavey to feed the line in connectors on my Marantz PMD-670.

The results were interesting. It took a lot of attention to keep from bumping the guitar into the mic. I’ll probably try moving the mic to the 12th fret area, next time. The audience seemed happy with the balance and volume, but on the recording the guitar is pretty quiet, and the typical coffee shop background noises are pretty loud. I did think the tonal quality of the recording was pretty acceptable, and I’m looking forward to trying some “studio” tests with these mics.

In the meantime, I put two of the tunes from the Pac Bay show up at the Kaleponi.com Music Page.


Hello, and welcome

Friday, October 27th, 2006

Howdy, and welcome to my acoustic guitar/recording blog. I am not a guitar expert, nor am I a recording expert, but I enjoy both. My guitar playing is almost exclusively Hawaiian slack key, and my recordings are almost exclusively my own solo acoustic guitar projects. As a result, I know nothing about overdubbing, and my use of effects is pretty limited.

I’m a big fan of Doug Young‘s playing and recording skills, and we’ve experimented together with mics and microphone techniques, as well as other aspects of recording. One of the observations he often makes is that there is relatively little information directly related to fingerstyle acoustic guitar recording. I’ll try to do my part to add a little to the information on this topic, based on my own experiences.

I’ll also share what I learn about sound reinforcement for live performance from a player’s point of view. Once again, I’m no expert in this area, but my mistakes and learning experiences might save you a little time and trouble, or stimulate some new ideas.

Fran


About the Blog

    Howdy, my name is Fran Guidry and this is my Homebrewed Music blog.

    I play Hawaiian slack key guitar and recorded my solo acoustic CD at home. Most of the recording information I find on the internet seems focused on bands, drums, multitracking, and so on but my main focus is recording solo acoustic guitar. Lately I’ve been enjoying video recording along with audio, so that shows up in the blog as well.

    I’m also a guitar nut. I love big ones and little ones, handmades and factory guitars, cheap ones and expensive ones. So I’ll be sharing the fun of exploring guitars as well, along with the challenges of amplifying acoustic guitars for live performance.

    Welcome!

Philosophy

    My recording philosophy is pragmatic, skeptical, not super critical. After all, the performance is by far the most important component of a track, and every aspect of any recording is a matter of taste.

    But I do like to know “about stuff.” Back in hifi days I learned about double blind testing. I learned that we humans can easily hear differences that don’t really exist. The more I’ve learned about our human auditory system, the more I’m skeptical of what people say they hear, especially if they claim that a particular microphone or preamp or cable has some magical property.

    I’ve only been recording since 2001, and when I started I found the usual places on the internet. I sought advice and accepted it, thought I would improve my recordings by using more expensive equipment. It didn’t work.

    Two things that did seem to lead to better recordings were experience and room treatment. Getting an appealing sound is the combination of many small details, and learning those details only comes from experience. Amd the sound of the recording space is obviously a big factor.

    I’ve only recorded seriously using digital technology, but I remember trying to record rehearsals and gigs back in analog days. I don’t have any nostalgia for analog recording and playback systems at all. I think even low end digital systems can capture marvelous recordings. So when I look at gear, I look for good specs: low noise, broad flat frequency response, wide dynamic range, low distortion. I’m not interested in colorful components, mics and preamps with a sound, I want the sound to be the sound of my guitar.

    But the last word is that I’m just learning and I hope you find something useful in my posts.