G Natural – Saving User Settings

Tuesday, December 11th, 2007

I ran into a little problem when I upgraded the software in my G Natural to the 1.03 release. I have to confess that I didn’t check the status of my user patches before installed the software, but after I finished the upgrade my patches were gone. I contacted TC support and they told me that the upgrade should not wipe out the user patches, so I suppose I did something else wrong, it certainly wouldn’t be the first time. But at least one other user on the TC G Natural support forum said he had the same problem.

I asked TC if they could offer a suggestion for saving my user patches, and they pointed me to Midi-Ox as a tool that can capture and restore MIDI information. Since I’m nearly totally ignorant of MIDI, I ran into a few issues but I’ve now succeeded so I thought I’d share what I’ve learned.

Hardware

The hardware you’ll need are a MIDI port on your computer (actually two of them, one for input and one for output) and one or two MIDI cables. Connect the computer MIDI OUT to the G Natural MIDI IN, connect the computer MIDI IN to the G Natural MIDI OUT.

Software

Download and install the MIDI-OX software on your computer.

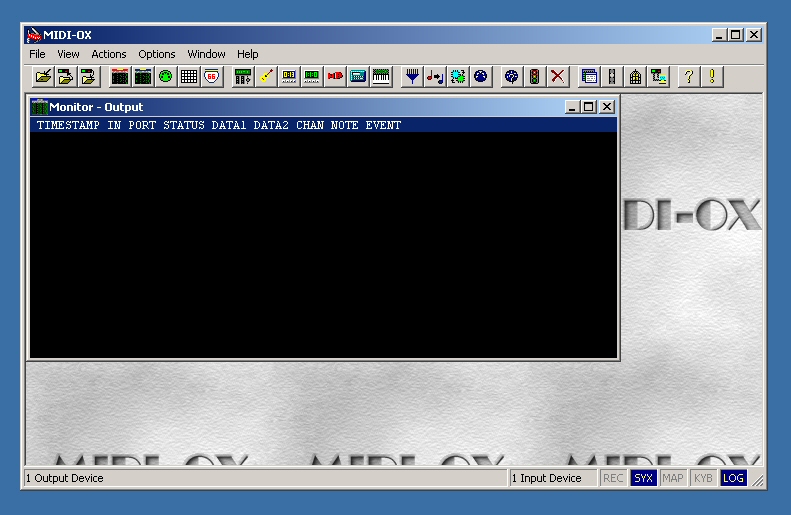
Start the MIDO-OX software, you should see a screen something like this:

Select Options | MIDI Devices… and you should see this, but with your own set of available devices:

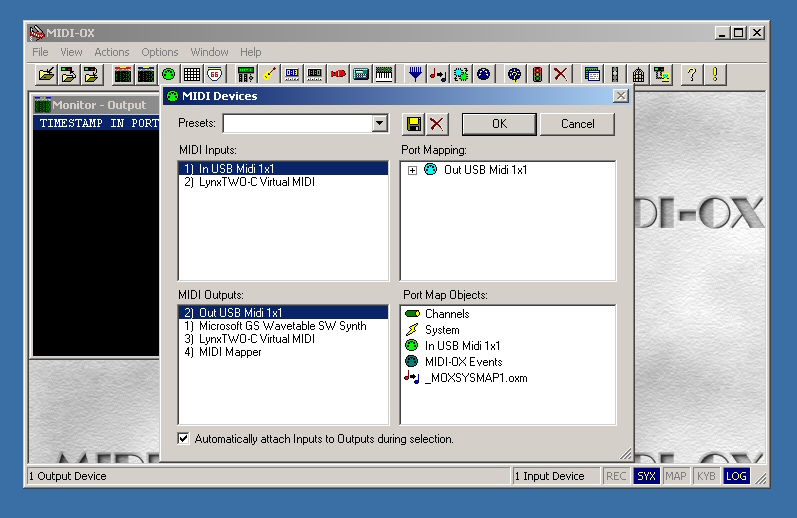
Click and highlight the input and output MIDI devices you hooked to your G Natural earlier. Click OK.

G Natural

Here we come to a possible gotcha of the first order. The 1.03 software update is advertised to enable MIDI functions. This makes sense because these functions are not yet documented in the latest manual on the TC site. So I suppose users who want to save their settings before upgrading to software version 1.03 are just out of luck. Oops. Still, once you have 1.03 installed, you’ll have a way to save settings in the future.

You get to MIDI functions by starting with the Menu button. Using the Edit D knob, scroll to the MIDI selection, then press Menu again to activate the MIDI menu.

Again using the Edit D knob, scroll to PrgChg.In: and make sure it’s set to Off. If it’s On, use Edit A, B, or C to change the value to Off.

Scroll with Edit D to PrgChg.Out: and once again make sure it’s Off.

Now scroll with Edit D to Dump System (for system wide settings) or Dump Bank (for user patches).

MIDI-OX

The particular corner of the MIDI world we’re using is called SysEx. This stands for System Exclusive, and it seems to be a method for storing and retrieving configuration information via MIDI. If you’re really curious. I’m sure there are lots of great tutorials out there in webland. Regardless, we can use MIDI-OX to capture a SysEx dump from the G Natural, save it to a file, and send the dump back to the G Natch.

In MIDI-OX, click View | SysEx… and you should see this:

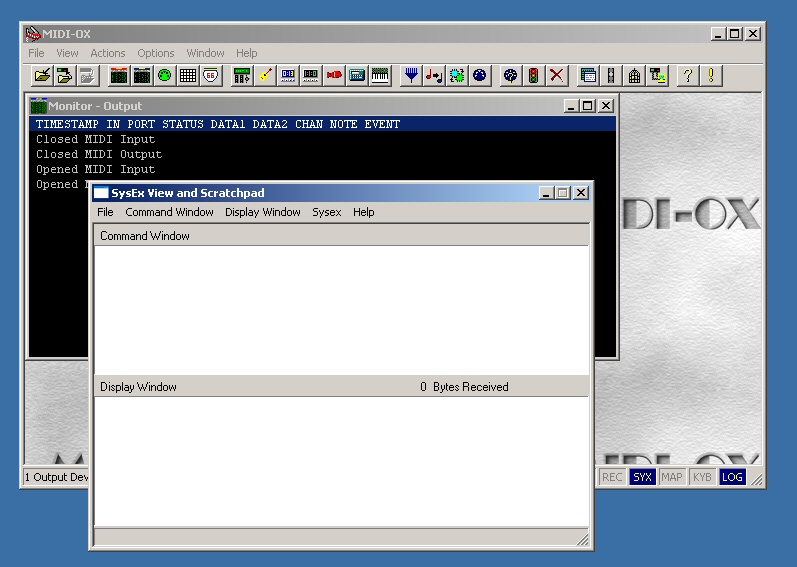
In the SysEx View and Scratchpad window, click Sysex | Receive Manual Dump… and you’ll see this:

G Natural

Press the Menu button on the G Natural and you’ll see a message telling you the dump is taking place.

MIDI-OX

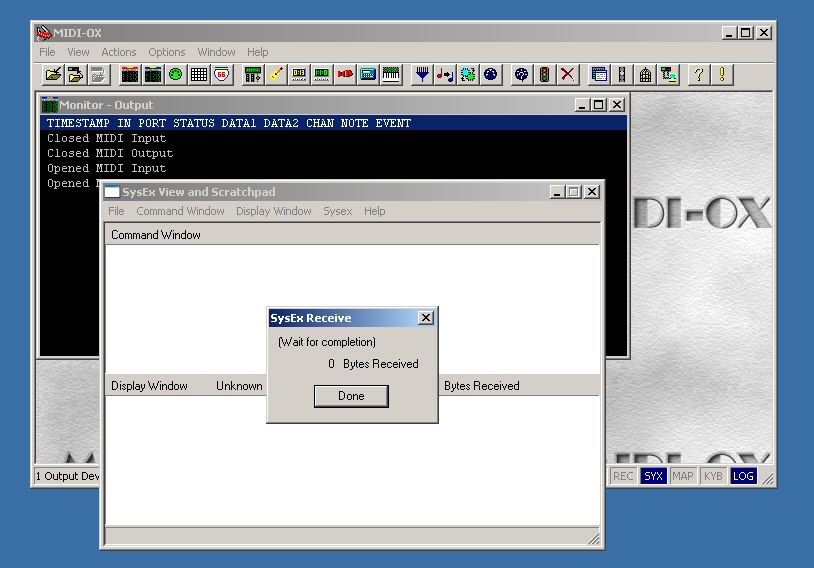
You’ll see a byte count in the Sysex Receive message box. Press the Done button and you can view the results of the SysEx dump. The lower Display Window now contains the data from your G Natural, displayed in Hexadecimal format.

Click Display Window | Save As… to save the SysEx dump to a file of your choice.

Restoring Saved Settings

To restore your settings, simply activate the SysEx window and click File | Send Sysex file… and navigate to the file you saved in the previous step. You don’t have to take any action on the G Natural except to have it turned on and connected to your MIDI port.

In Conclusion

Hopefully this writeup will help other G Natural users. Even though I still enjoy the great sounds and control provided by the G Natural, I’m a little disappointed that I had to figure this procedure out on my own, and gather the tools myself. I’m also disappointed that an update to the manual has not been provided to go along with the software update. We’re once again operating our machines without accurate documentation. And finally, I expected to have a computer based patch editor available when I bought the G Natural. I had one with my much less expensive Yamaha MagicStomp, so I’m really unpleasantly surprised to find that TC Electronics does not provide one. A proper editor would make saving and restoring settings a snap, and make creating and configuring patches a lot easier as well.

TC Electronics has setup a forum area where we can share experiences and possibly encourage TC to expedite updates to the documentation and to provide a patch editor. I hope to see you there.


Initial G Natural Explorations

Friday, August 31st, 2007

I busted the budget for a new toy – the TC Electronics G Natural. I’ve been using a simple Boss DD-3 Digital Delay for my only effect, running into either a Fishman Performer Pro amp or a PA based on an old Peavey XM-6 mixer amp. I’ve never been too thrilled with my amplified sound, so I’m starting the process of (hopefully) upgrading.

The new G Natural is a floor box with big sturdy stomp switches controlling a collection of pristine effects with a clever system for storing user settings. The box includes routing for a microphone, pickup, and line inputs, but there are some limits on how these can be combined.

I’ve been working around home with the G Natch, and I’ve used it on two gigs, so I’m beginning to get a handle on the major features and capabilities. I’m sure it will reward a lot of study and tweaking, but I’m ready to pass along some first impressions even though they’re preliminary.

I made a big goof when I first began using this device. The input gain setting is buried in the levels menu, and in the “preliminary” manual that came with my unit did not have the correct information for the unit I received, so I did not understand the importance of the “Input Gain” setting. Instead, I used too much gain to boost the ouput from the G Natural, and the result was a lot of hiss. After a day or so of frustration I discovered the correct setting, then I found the updated manual online at the TC site, and since then I’ve been extremely impressed with the sound quality and low noise of the unit. So kudos to TC for creating such a high quality box, and lemons for shipping the unit with an incorrect manual.

Even with the updated manual the information is fairly skimpy, and the organization is a bit less than ideal. But since the book (actually a PDF) is so short it’s not too big a challenge to read the whole thing a couple of times and gradually pull the pieces together.

One question I had before working my unit – can the G Natural be used as a DI or Direct Input device. A DI is a device which takes a 1/4″ high impedance unbalanced input, like a guitar pickup, and converts the signal to a balanced low impedance output on a male XLR connector. This is very handy for stage use because low impedance balanced cables can be run for long distances without signal loss or noise buildup. DIs are also used in the studio for connecting bass, guitar, or other unbalanced signals to balanced mic inputs.

Since the G Natural has a male XLR on the back, it might seem that this is a DI output, but that is not the case. This connector will only deliver the signal connected to the Mic Input, not the signal connected to the instrument input. So the simple solution won’t work. However, the 1/4″ outputs are balanced, which means that a simple adapter cable can be bought or made to provide DI functionality from the main outputs. HOWEVER, TC warns that these outputs should not be connected to an input providing phantom power. This is important, and easy to overlook. On your own mixing board, you’ll probably check phantom power and turn it off as needed, but if you’re working with various sound engineers in various venues, the chance for a mistake may be too high. And in some PA mixers, the phantom power cannot be controlled for individual channels, so this limitation may lead to other problems. In other words, I think I’m going to buy a DI to add to my signal chain before I connect the G Natural to a PA other than my own.

A look through the manual will show that all the effects needed for enhancing an acoustic sound are present – compression, eq, modulation, delay, and reverb. The unit also features a “one click” boost feature that simply raises the level for solos. Notice that there is no distortion effect included – if distortion is part of your acoustic sound, you’ll probably want a different multi-effects unit.

Finally, here are some samples. I played each clip separately, so there are plenty of performance variations. The guitar is a Martin OM-18GE with a K&K Pure Western pickup.

I miked the guitar with a Shure KSM141 set flat, cardioid pattern, about 6″ from the 12th fret, through a John Hardy M-1.

Here’s the direct pickup sound, through an M-Audio DMP3.

The pickup through the G Natural, all effects bypassed (setting F9-3).

The G Natural setting F0-1, Subtle Acoustic.

Something on the wild side, F4-3, Clean Cowboy.

F5-3, Clean Chorus.

I’ve created a few user settings, here’s the one stored at U0-2.

Next time I’ll talk about the stompbox-edness of the G Natural. There are lots of useful variations to be had by stepping on the big chrome buttons.


About the Blog

    Howdy, my name is Fran Guidry and this is my Homebrewed Music blog.

    I play Hawaiian slack key guitar and recorded my solo acoustic CD at home. Most of the recording information I find on the internet seems focused on bands, drums, multitracking, and so on but my main focus is recording solo acoustic guitar. Lately I’ve been enjoying video recording along with audio, so that shows up in the blog as well.

    I’m also a guitar nut. I love big ones and little ones, handmades and factory guitars, cheap ones and expensive ones. So I’ll be sharing the fun of exploring guitars as well, along with the challenges of amplifying acoustic guitars for live performance.

    Welcome!

Philosophy

    My recording philosophy is pragmatic, skeptical, not super critical. After all, the performance is by far the most important component of a track, and every aspect of any recording is a matter of taste.

    But I do like to know “about stuff.” Back in hifi days I learned about double blind testing. I learned that we humans can easily hear differences that don’t really exist. The more I’ve learned about our human auditory system, the more I’m skeptical of what people say they hear, especially if they claim that a particular microphone or preamp or cable has some magical property.

    I’ve only been recording since 2001, and when I started I found the usual places on the internet. I sought advice and accepted it, thought I would improve my recordings by using more expensive equipment. It didn’t work.

    Two things that did seem to lead to better recordings were experience and room treatment. Getting an appealing sound is the combination of many small details, and learning those details only comes from experience. Amd the sound of the recording space is obviously a big factor.

    I’ve only recorded seriously using digital technology, but I remember trying to record rehearsals and gigs back in analog days. I don’t have any nostalgia for analog recording and playback systems at all. I think even low end digital systems can capture marvelous recordings. So when I look at gear, I look for good specs: low noise, broad flat frequency response, wide dynamic range, low distortion. I’m not interested in colorful components, mics and preamps with a sound, I want the sound to be the sound of my guitar.

    But the last word is that I’m just learning and I hope you find something useful in my posts.